
EMS Systematic Approach to Calls: How to Stop Guessing and Start Managing the Call
EMS calls can get messy fast.
One minute you are sipping station coffee and pretending the paperwork will do itself. The next minute you are dispatched to a 17-year-old mountain biker who crashed, is unresponsive, and may be somewhere awkward, slippery, dark, or halfway down a trail that was clearly designed by someone who hates stretchers.
This is where a systematic approach matters.
The EMS systematic approach gives EMR, EMT, PCP, ACP, and paramedic providers a step-by-step structure for managing calls. It helps you know where you are in the call, what information you need, what needs to happen next, and when to stop overthinking and start moving.
This free video series breaks EMS calls into smaller chunks: call preparation, dispatch, arrival, scene size-up, patient approach, initial assessment, ABCs, rapid body assessment, treatment, packaging, transport, reassessment, and handover.
The goal is simple: make calls easier to manage.
Not easy. This is EMS. Let’s not get carried away.
But easier.
You can watch the free videos as part of the EMS systematic approach series, and if you want the full training with more detailed teaching, quizzes, learning resources, and a certificate that may be submitted to the Alberta College of Paramedics for continuing education credits, you can check out the full course here:
EMR, EMT, and Paramedic Call Management Course
https://www.emseducation.ca/courses/emr-emt-paramedic-call-management/
Why EMS Providers Need a System
When you are new, every call can feel like a giant pile of information landing on your lap.
Dispatch gives you a chief complaint. Your partner asks what you want to bring. Fire may already be on scene. Family members are talking. The patient may be sick, confused, combative, embarrassed, pale, sweaty, short of breath, or all of the above.
Then your brain does that helpful thing where it opens 47 tabs at once.
A systematic approach reduces that mental clutter.
Instead of asking, “What do I do?” you ask, “Where am I in the call?”
That question is much easier to answer.
If you are en route, you think about dispatch information, safety, likely resources, and what equipment you may need.
If you have arrived, you think about parking, egress, hazards, BSI, number of patients, and mechanism of injury.
If you are approaching the patient, you form a general impression.
If you are patient-side, you assess level of consciousness, airway, breathing, circulation, and deadly bleeding.
Then you decide if the patient is stable, unstable, or load-and-go.
This structure helps students in scenarios and exams, but it also helps real providers on real calls. The call may be chaotic, but your process does not have to be.

Video – EMS Calls: Step-by-Step Introduction
Step 1: Start Before You Arrive
The call starts before you see the patient.
Dispatch information is not perfect. It is often the EMS version of the telephone game. Someone calls 911, dispatch collects information, and that information gets passed to you. It may be accurate. It may be incomplete. It may be “abdominal pain” that turns into a cardiac arrest, because EMS likes surprises.
Still, dispatch gives you a starting point.
For example, if you are dispatched to an unresponsive 17-year-old male who crashed on a mountain bike, you already know a few things.
This is likely trauma. There may be a mechanism of injury. Spinal motion restriction may be needed. The patient may be off-road or in a hard-to-access location. You may need fire, rescue, extra hands, or specialized equipment. You should think about PPE, hazards, terrain, and patient movement before you arrive.
That does not mean you lock onto one plan and ignore everything else. It means you start forming a flexible plan.
Good EMS providers do not just respond. They prepare.
Before arrival, ask yourself:
What type of call does this sound like?
What equipment should we bring?
What hazards could be present?
Do we need to stage?
Could we need more resources?
What is the likely patient condition?
What is our first move if the call is worse than expected?
That last question matters because the call is often worse than expected. Or weirder. Sometimes both.
Video – EMS Arrival Checklist – EMS Call Management
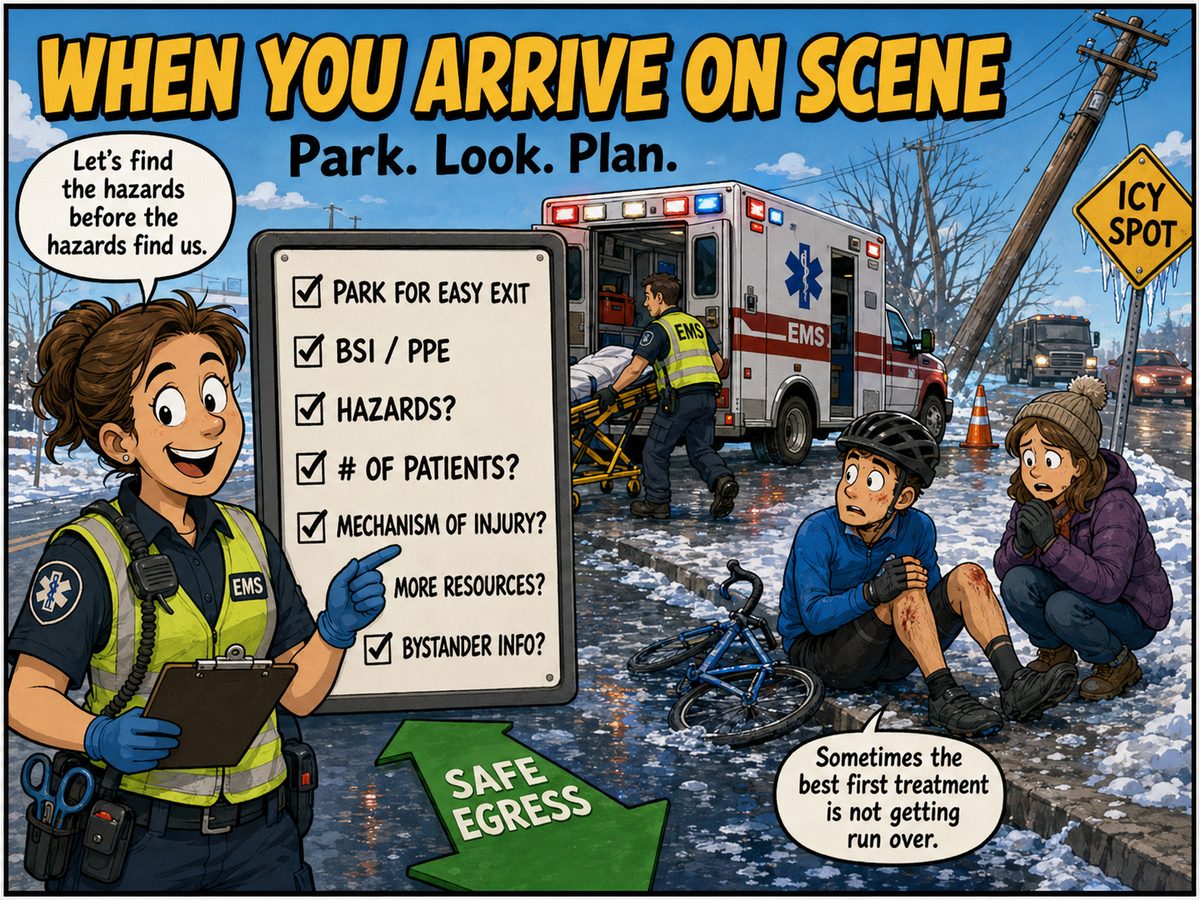
Step 2: Arrival and Scene Size-Up
When you arrive, your first job is not to sprint dramatically toward the patient like you are in an EMS recruitment video.
Your first job is to think.
Where should you park?
Can you leave quickly if the scene becomes unsafe?
Can other resources get in?
Can you get your stretcher and equipment out?
Can you get the patient back to the ambulance without turning patient movement into a CrossFit event?
Ambulance placement matters. Safe egress matters. Visibility matters. If you are on a roadway, high-visibility gear matters. If it is winter and there are snow windrows, ice, traffic, and poor lighting, your parking decision can make the call smoother or turn it into a slow-motion disaster with paperwork attached.
Scene size-up includes:
Body substance isolation and PPE
Scene hazards
Mechanism of injury
Number of patients
Need for more resources
Bystanders and available information
Safe access and egress
Patient movement considerations
Hazards can include traffic, violence, animals, fire, chemicals, electrical wires, weapons, unstable surfaces, weather, and the classic “dog that the owner says is friendly while it actively tries to eat your boot.”
The scene does not care that you are trying to help. You still need to protect yourself, your partner, the patient, and other responders.
If there are multiple patients, you need more resources. If there are wires down, you may need the utility company. If there is violence, you may need police. If there is a difficult extrication, you may need fire. If you are looking at a major mechanism of injury, you may need to prepare for rapid transport.
Scene size-up is not just something students say in scenario testing.
It is the first real decision-making point of the call.
Video – What a Paramedic needs to evaluate when approaching the patient.
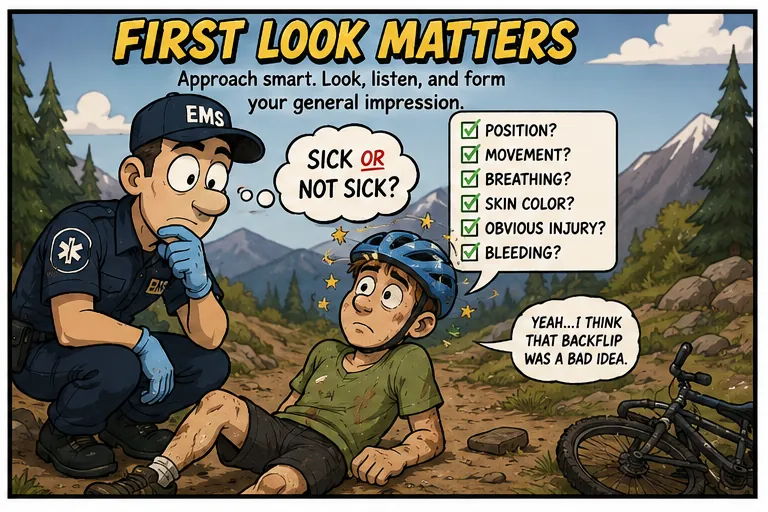
Step 3: Approaching the Patient
Patient assessment starts before you touch the patient.
As you walk toward them, you are already collecting information. This is your general impression, sometimes called the doorway view or approach view.
This is where you ask: sick or not sick?
That phrase gets used a lot in EMS, but it is useful because the answer changes the pace of the call.
Look at the patient’s position.
Are they sitting upright?
Slumped forward?
Lying flat?
Face down beside a bike?
Clutching their abdomen?
Curled into a fetal position?
Leaning forward and working hard to breathe?
Tracking you with their eyes?
Waving you over?
Not moving at all?
A patient sitting upright with good skin colour, speaking clearly, and pointing to an ankle injury looks very different from a patient who is pale, sweaty, face down, and not responding.
That first look gives you clues.
Now look for movement.
Are they moving normally?
Are they restless?
Are they weak?
Are they tracking you?
Are they seizing?
Are they barely moving?
Are they not moving at all?
Look at breathing.
Are they breathing normally?
Too fast?
Too slow?
Shallow?
Laboured?
Only speaking two or three words at a time?
Not breathing?
Look at the skin.
- Pale, cool, sweaty skin should get your attention. So should cyanosis, mottling, flushing, or any skin condition that does not match “this person is doing fine.”
Look for obvious bleeding or injuries.
- If there is deadly bleeding, deal with it. Right now. Not after a full history. Not after a beautiful set of vitals. Blood belongs inside the patient. That is one of the few EMS rules that is not up for debate.
If the patient is not breathing, check a pulse and start managing the airway and ventilation. If there is no pulse, start CPR and get the AED or monitor moving.
This is where the systematic approach becomes practical. You are not just observing. You are deciding if something needs immediate intervention.

Video – Paramedic Patient Assessment – Then ABC’s
Step 4: LOC, ABCs, and Deadly Bleeding
Once you are at the patient’s side.
Introduce yourself.
“Hi, my name is Jason. I’m a paramedic. Can I help you today?”
That simple introduction does several things. It tells the patient who you are. It starts rapport. It gives you an immediate sense of the level of consciousness. It also provides a repeatable script, which reduces cognitive load.
Scripts are underrated in EMS.
When you say things the same way every time, you do not need to invent language under stress. You just run the script. Your brain can focus on the patient instead of trying to sound clever while someone’s oxygen saturation is making questionable life choices.
Assess level of consciousness.
Are they alert?
Confused?
Obtunded?
Unresponsive?
You can use AVPU:
Alert
Responds to verbal stimulus
Responds to painful stimulus
Unresponsive
Assess Orientation:
Person
Place
Time
Event
If the patient is missing one of these, they may be altered. That matters. A confused patient may be a load-and-go patient depending on context. Altered LOC can come from many causes, including hypoglycemia, hypoxia, hypotension, opioid overdose, head injury, stroke, shock, or other serious conditions.
Then move into the ABCs.
Airway
Is the airway open and clear?
If the patient is sitting upright and talking, the airway is likely open. If they are obtunded or unresponsive, listen.
Snoring suggests the tongue or soft tissue may be obstructing the airway. Open the airway with a jaw thrust or head-tilt chin-lift depending on context and spinal concerns.
Gurgling suggests fluid in the airway. Suction.
Stridor suggests upper airway obstruction. Think foreign body, croup, epiglottitis, or other airway narrowing. Treat gently when appropriate and avoid making the airway worse.
Silence can be bad. If you do not hear breathing, check for breathing and pulse immediately.
Airway is not a checkbox. It is a decision point.
Breathing
Is the patient breathing? What is the rate, depth, and effort?
A normal adult respiratory rate is often taught as 12 to 20. But on calls, the key is to notice what is abnormal.
Too fast matters.
Too slow matters.
Too shallow matters.
Too much effort matters.
Not breathing definitely matters.
If they are not breathing adequately, you may need oxygen, airway positioning, a BVM, or ventilatory support.
If they are not breathing at all, check a pulse.
Do not admire the problem. Treat it.
Circulation and Deadly Bleeding
Check for major bleeding. A rapid wet check can help you find blood you may not see right away.
Control severe bleeding with direct pressure, dressings, wound packing, or tourniquet use depending on the situation and your protocols.
Then assess pulse.
Compare carotid and radial pulses. Look at rate, rhythm, and quality.
A weak radial pulse compared to a carotid pulse may suggest poor perfusion. No radial but a carotid pulse may also suggest circulatory compromise. A very fast, very slow, irregular, weak, or absent pulse changes your priorities.
If there is no pulse, start CPR, apply the AED or monitor, and get help moving.
At this point, you should know if the patient is stable enough for further assessment on scene or unstable enough to start moving.

Video – Paramedic Rapid Body Assessment. – Check Before You Move
Step 5: Rapid Body Assessment
The rapid body assessment is where you look for the problems you do not want to miss.
In trauma, some findings are obvious. The leg pointing in a direction legs do not normally point is generally a clue. In medical calls, the clues may be quieter. You still need to look for hidden trauma, abnormal findings, and red flags.
The rapid body assessment is a head-to-toe survey.
Start with the head and neck.
Look and palpate for deformities, contusions, abrasions, penetrations, burns, lacerations, swelling, tenderness, instability, and crepitus.
Check pupils. Are they equal and reactive? Pinpoint pupils may suggest opioid use. A blown pupil may suggest serious head injury, though some people have baseline pupil abnormalities. EMS loves exceptions because apparently the universe has a sense of humour.
Look for signs like raccoon eyes, Battle’s signs, fluid from ears, or other head injury clues. These may not always appear early, but they matter when present.
Assess the neck.
Look for jugular vein distention and tracheal deviation. If spinal motion restriction is needed and a collar is appropriate, this is where it may fit into your flow.
Move to the chest.
Look for DCAP-BTLS, asymmetrical chest rise, paradoxical movement, accessory muscle use, and obvious injury. Palpate for tenderness, instability, crepitus, and subcutaneous emphysema.
Listen to lung sounds if appropriate.
Wheezes may suggest bronchospasm. Crackles may suggest fluid. Congestion, pneumonia, heart failure, and other conditions can overlap, so match lung sounds to the full patient picture.
Move to the abdomen.
Look for distension, rigidity, tenderness, lacerations, penetration, swelling, or evisceration. If listening for bowel sounds, do that before palpation.
Move to the pelvis.
Assess carefully. If the pelvis is unstable, do not keep checking it like you are trying to win a prize. Check once, recognize the problem, and consider a pelvic binder or appropriate stabilization based on your protocol.
Look for incontinence, pain, instability, or signs suggesting spinal injury or significant unconsciousness.
Move to the extremities.
Check lower and upper extremities for injury, bleeding, deformity, circulation, motor function, and sensation.
CMS matters:
Circulation
Motor
Sensation
Can they feel you touching them?
Can they move fingers and toes?
Are pulses present?
Is capillary refill reasonable?
Is one side weaker than the other?
Are there signs of stroke, spinal injury, or poor peripheral circulation?
The rapid body assessment helps you decide what needs treatment, what needs packaging, and how fast you need to move.
Video – Paramedic Treatment Plan
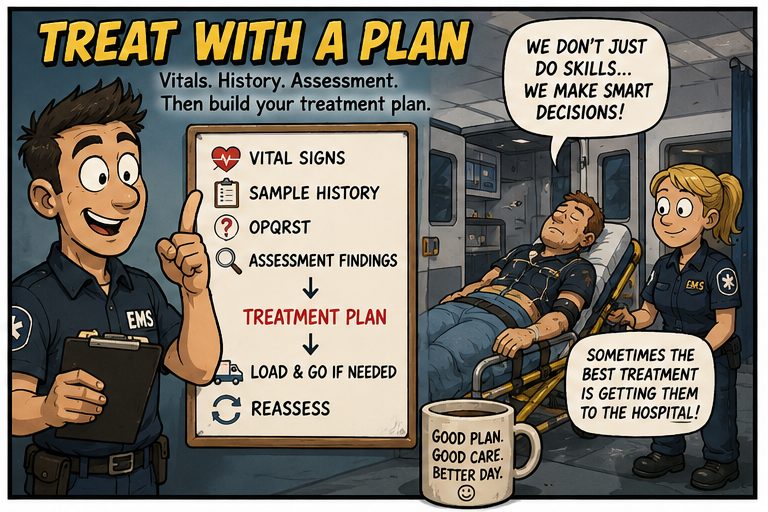
Step 6: Vital Signs, History, and Treatment
Before treatment, you need enough information to make a good plan.
That usually means vital signs and history, unless the patient is so unstable that you need to move and treat immediately.
Vital signs may include:
Respiratory rate
SpO2
Pulse
Blood pressure
Blood glucose
Temperature
End-tidal CO2 when appropriate
Here is a useful tip: do not overload your brain trying to memorize every normal number in real time. Focus on what is abnormal.
If the respiratory rate is 24 and the pulse is 120, those are the numbers that matter. If everything else is normal, do not spend your limited working memory polishing normal findings like a trophy.
Abnormal findings guide decisions.
Then get a SAMPLE history:
- Signs and symptoms
- Allergies
- Medications
- Past medical history
- Last oral intake
- Events leading up
Use OPQRST when pain or symptom detail matters:
- Onset
- Provocation/palliation
- Quality
- Radiation
- Severity
- Time
Now build your treatment plan.
Say it out loud when needed. Tell your partner what you are thinking.
For example, if this looks like an asthma call, your plan may include positioning, oxygen as needed, MDI with spacer or nebulized medications depending on your level and protocols, reassessment, and transport decision-making.
If the patient is critical, focus on life threats and movement. Some interventions must happen immediately: airway opening, BVM ventilation, CPR, AED/defibrillation, bleeding control, or other critical actions.
Other interventions can happen in the ambulance while moving toward the hospital.
That is the key point: treatment does not mean standing on scene until everything is perfect.
Sometimes the best treatment plan is to fix immediate life threats, package the patient, start moving, reassess, and continue care during transport.
Step 7: Patient Handling and Transport
How you move the patient matters.
A trauma patient with a suspected pelvic fracture may need careful movement, a scoop stretcher, and a pelvic binder ready. A patient with a femur fracture may need stabilization and rapid movement. A patient with severe shortness of breath or chest discomfort should not be marched to the ambulance because “they can walk.”
That is not patient care. That is cardio with liability.
If someone has severe shortness of breath, chest pain, poor perfusion, altered LOC, or significant weakness, reduce exertion. Carry them, assist them, or use the stretcher.
During transport, reassess.
Reassess after movement.
Reassess after treatment.
Reassess when the patient changes.
Reassess when something feels off.
You can complete non-critical treatments, continue secondary assessment, monitor trends, and patch to the receiving hospital.
The systematic approach does not end when the wheels start rolling. It continues until handover is complete.
What to Do When You Get Lost on a Call
Every provider has had that moment.
You are on scene. There is noise, family, equipment, a patient who is not following the textbook, and your brain starts buffering.
When that happens, go back to the system.
- LOC.
- Airway.
- Breathing.
- Circulation.
- Deadly bleeding.
- Vitals.
- History.
- Treatment plan.
- Transport.
- Reassess.
The system gives you a place to restart.
It also helps in exams and scenarios. If an evaluator asks, “What would you do next?” the systematic approach helps you answer without randomly grabbing interventions out of the EMS junk drawer.
Take the Full Call Management Course
The free videos are a strong starting point.
The full EMR, EMT, and Paramedic Call Management Course goes deeper. It includes more detailed teaching, quizzes, learning resources, and a certificate that may be submitted to the Alberta College of Paramedics for continuing education credits.
This course is built for EMS providers who want a stronger structure for managing calls from dispatch to handover.
Check out the full course here:
EMR, EMT, and Paramedic Call Management Course
https://www.emseducation.ca/courses/emr-emt-paramedic-call-management/
Because EMS calls are already complicated enough.
Your system should not be.